My PC wasn’t slow enough to justify buying new hardware in 2026, but it was sluggish enough to irritate me every single day. You know that feeling—clicking something and waiting just a beat too long, watching windows stutter as they minimize, or wondering why a machine that’s only a couple of years old suddenly acts like it’s from a decade ago. What I eventually learned is that Windows slowness often has nothing to do with aging components. Instead, it’s the accumulation of default settings, visual fluff, and background clutter that quietly eats away at responsiveness. The moment I gave Windows a few intentional nudges, everything snapped back to life.
What I’m about to share isn’t a deep registry hack or some risky system modification. These are straightforward tweaks that Microsoft deliberately leaves in your hands, and you can finish all of them in under 15 minutes. I went in with low expectations, but the difference was immediate—no more lag when switching between apps, faster boot times, and a generally snappier experience. Here’s exactly what I changed, and why you should too.
Stop Letting Fancy Animations Kill Your Speed
Windows is obsessed with looking polished. Subtle shadows, smooth fades, glass-like transparency, and sliding menus make the interface feel modern, but they also force your GPU and CPU to work harder just for window dressing. On my laptop, especially when running on battery, these effects turned simple actions into slow-motion sequences.
The fix is buried in a legacy-sounding menu that still exists in Windows 11 (and 10). Type “Performance” into Windows Search and select Adjust the appearance and performance of Windows. You’ll land on a dialog box that offers two extremes: “Adjust for best appearance” and “Adjust for best performance.” The best performance option strips away almost every animation and visual flourish. I’ll be honest—it made my PC feel like I’d traveled back to 2005, but the speed boost was undeniable. If you can’t stomach the retro look, just choose Custom and uncheck a few of the heaviest hitters like “Animate windows when minimizing and maximizing” and “Enable transparency.” I kept shadows and smooth-edge screen fonts and still got 90% of the performance gain.
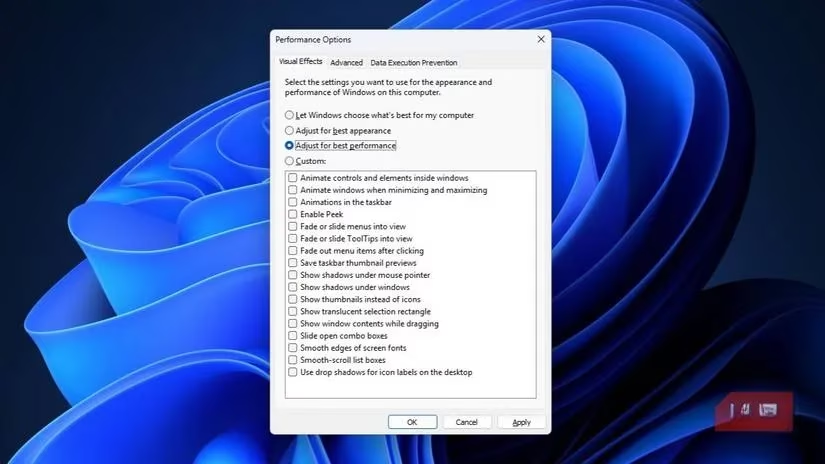
Give it a try. You might be shocked at how much snappier right-click menus and file explorer feel when they aren’t waiting for a fade animation to complete.
Kick Uninvited Startup Programs to the Curb
Over the years, I’d installed—and uninstalled—dozens of apps, yet somehow a parade of helpers still booted up the second I logged in. Cloud sync tools, game launchers, printer status monitors, and mystery processes I didn’t even recognize all fought for resources before I could open a single browser tab. Windows 11’s Task Manager lays this out plainly.
Right-click the Start button (or press Ctrl+Shift+Esc) and open Task Manager. Navigate to the Startup apps tab. The list often surprises people. I found everything from an old PDF reader to a video conferencing app I hadn’t used in months all set to “Enabled.” For each unnecessary item, right-click and select Disable. I didn’t touch things like my antivirus or OneDrive, but gutting the rest trimmed my boot time by nearly 20 seconds.
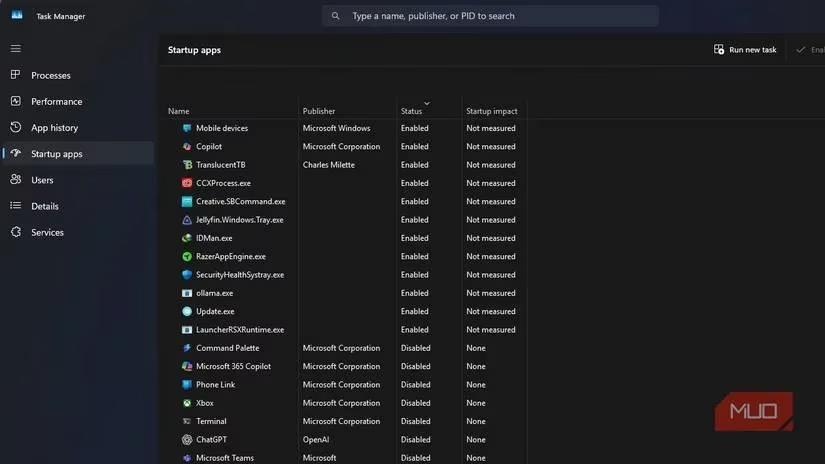
A small warning: new software installations love to re-add themselves to startup without asking. I now check this tab every couple of months, just to make sure nothing snuck back in.
Hunt Down Background Resource Hogs
Even after I culled the startup list, my machine sometimes sounded like a jet engine while sitting idle. The culprit was background processes—apps that launch at startup but also those that quietly spin up later and stay running without a visible window. Third-party password managers, updaters, and media servers all consumed memory and CPU cycles in the shadows.
In the same Task Manager, the Processes tab splits active programs into “Apps” and “Background processes.” Sort by CPU or Memory to spot the drainers. I identified a photo-syncing utility that was using 15% of my CPU doing absolutely nothing useful. A quick right-click and End task freed that horsepower instantly. Be careful here—avoid ending processes with names you don’t recognize and that come from Microsoft, because some are essential for system stability. Stick to third-party programs you’ve installed. This isn’t a one-time fix, either. I’ve made a habit of glancing at this list whenever my fans spin up for no reason, and it works like a charm.
Unlock Full Power with the Right Power Plan
By default, Windows uses a Balanced power plan, which is a compromise designed to prolong battery life. It throttles your CPU dynamically, reduces PCI Express link states, and limits other hardware capabilities. That’s great when you’re on a long flight, but not when you’re sitting at a desk plugged in and need every ounce of responsiveness for video editing or even just a snappy coding session.
To change this, open Control Panel (yes, still kicking in 2026), go to Hardware and Sound > Power Options, and pick High Performance. Some laptops also offer an Ultimate Performance plan that goes a step further—if you see it, use it when plugged in. The trade-off is higher energy consumption and more heat, so I only activate this when my charger is connected. If you find High Performance too aggressive, create a custom plan and tweak individual settings like minimum processor state to 100% while keeping display sleep times reasonable. I’ve set my custom plan to behave like High Performance on AC power and switch back to Balanced on battery, which balances speed and longevity perfectly.
Force Apps to Use the Right Graphics Card
This final tweak fixed a head-scratcher for me. I have a laptop with both integrated Intel graphics and a dedicated NVIDIA GPU. Despite the dedicated card sitting there, some apps—including a lightweight game and a video editor—insisted on using the weaker integrated GPU. The result was stuttery playback and poor rendering times, and I initially blamed the age of my hardware. Nope, Windows just didn’t know better.
Windows lets you assign a specific GPU on a per-app basis. Head to Settings > System > Display and scroll down to Graphics (under “Related settings”). Here you can add a desktop app via Browse or pick a Microsoft Store app. Once added, click on the app, select Options, and choose High performance, which ties the app to your dedicated GPU. Save the setting and restart the app. In my case, the video editor’s export time dropped by 40% and the game ran smoothly at 60 fps instead of a choppy 30.
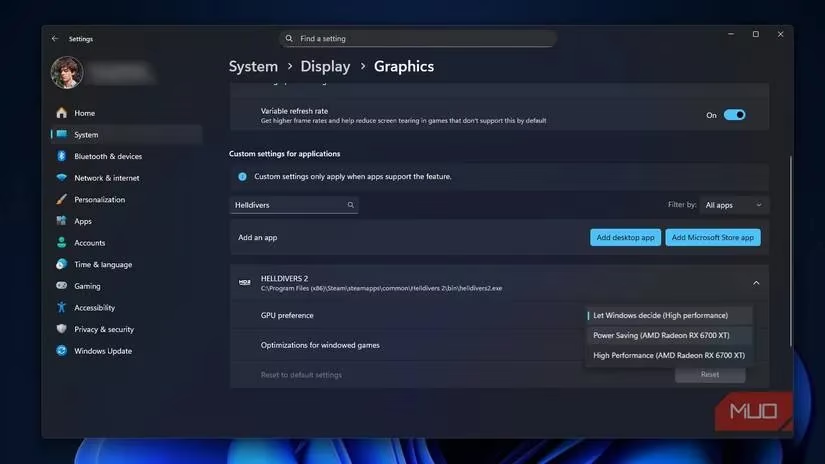
If you ever install a new program that demands graphical horsepower, check this setting. It’s far too easy for Windows to default to the integrated chip, leaving performance on the table.
Why This Matters More in 2026
Windows 11 has grown feature-rich over the last few years, but with every update come new background services and default settings that prioritize flair over speed. Even as hardware gets faster, software bloat keeps pace. I used to assume a slow PC needed an SSD upgrade or more RAM—and sometimes it does—but these five no-cost adjustments gave me a far bigger speed bump than I expected. My system now feels responsive hour after hour, and I haven’t seen a mysteriously pegged CPU since.
Remember that this isn’t a set-it-and-forget-it exercise. New apps will quietly inject themselves into your startup sequence, background processes will spawn after every software update, and your GPU assignments might reset if a driver updates. I’ve started doing a quick monthly check on these five spots. It takes three minutes, and my PC has stayed as fast as it was the day I first applied these changes. If your machine has been getting on your nerves, give these tweaks a shot. You’ve got nothing to lose but the lag.
Leave a Comment